|
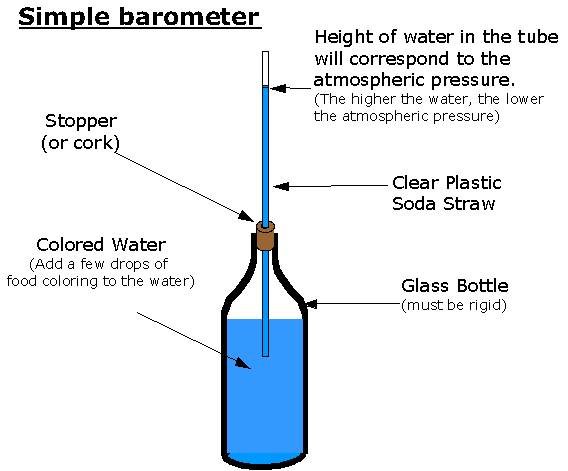
Ever Wanted To Make Your Own Barometer?It's Really Very Easy, And Only Requires Material You'll Find In Your HomeMake Your Own Water Barometer or Weather Glass The Homemade Barometer Part 3 In Part 2 of this series on How To Make A Barometer,you'll find how to make a barometer (actually two barometers)in much the same way that Evangelista Torricelli did whenhe invented the barometer in 1643. We'll forget that the original invention came by accident while he was investigatingthe production of a vacuum. But such is often the way of science. Torricelli's barometer was the model for all mercury based barometers for the next two centuries, and providedan easy, if not always convenient way of measuringair pressure. But at much the same time, a more simple method became popularfor predicting changes in the weather. It was called theWeather or Storm Glass, and was used by sailors, farmers, and otherswho needed to know what the weather was doing. It was relativelycheap, consisiting only of blown glass, and using only water,sometimes with other additives. The Weather Glass, also known as a Water Barometer,was quite useful, but was an indicator of weather changerather than a measurer of air pressure - it was almostimpossible to calibrate one with another, and was affectedby evaporation of the water. Nevertheless, weather glasseswere elegant instruments, and are still made today, mostlyas an ornament or talking point which actually does work. Make Your Own Weather Glass You will need a narrow necked bottle, a rubber stopper, a clear straw or piece of plastic tubing (the longer the better), some flexible window sealant, some water and some optional food coloring. The hardest thing to do in the making of this device is to bore a hole through the centre of the rubber stopper and fit the straw or tube into it. It needs to be as airtight as possible, which is why we use rubber rather than cork. Partly fill the bottle with water and food coloring - a little over half full. Insert the tube into the stopper and the stopper into the neck of the bottle. Make sure the end of the tube is below the water level. Now comes the fun part - blow a few bubbles into the water.
If everything has worked properly, after you've blown some bubbles water should rise into the tube, hopefully well above the top of the stopper. If not, check that everything is airtight and try again. Once you can see water in the tube a fair way above the stopper, use the sealant or some other glue to prevent any air leaking through the hole in the stopper or around its edges. You can add a scale or a ruler beside the tube to record changes in the water level. What you've done here is slightly increase the air pressure in the bottle by blowing air into it. The air can't get back out, and the greater air pressure inside the bottle will force water into the tube. Once the system has stabilized, changes in atmospheric pressure will cause the level of water in the tube to rise or fall. Increased air pressure will make the liquid fall, decreases pressure will cause it to rise - the opposite to the homemade Torricellian barometers. See if you can work out the reason for this - think about which lot of water is directly in contact with the outside air. One tip, which applies to all homemade barometers; try to make your barometer on a day which is neither too wet and stormy (low pressure) or sunny and still (high pressure) If you pick a day when the air pressure is at about the middle of its range, then the if the water starts at about the middle of the tube it will have plenty of room to move as the air pressure changes. This simple barometer works the same way as the weather glass, but the weather glass is a lot more elegant and attractive.
If you want to know more about Home Experiments Related to Weather, just follow the link to an excellent book, and I know from experience it's not just for kids. And here are some other top introductory weather books.
Peterson First Guide to Clouds and Weather
The Weather Wizard's Cloud Book
More About Barometers Here's where to go to find out about the History of the First Barometers. And while most scientific attention was concentrated on the mercury barometer, water based barometers like the one described above were also in use, and in big numbers. Follow the link to find out more about the Weather Glass. But both of these barometers had their problems, not the least of which was keeping the mercury or water in its container. As technology improved, the better, more convenient Aneroid Barometer appeared, and that is the most common form we see today. You can also find information on Setting and Calibrating Your Barometer, elsewhere in this site, together with reviews of Modern Barometers. This link will take you back to the Top, or, when you're ready, here's how to return to the Home page.
You may be interested to know that you can find out more about weather and home weather stations by receiving our newsletter ,"Watching Weather". It's published more or less weekly, and apart from tips on how to use your weather station and understand what it's telling you about the weather around you, it also covers many other weather related topics. If this sounds interesting, just add your name and email address to the form below. When you join, you'll also receive, totally free, a 20 page guide to setting up and trouble shooting problems in home weather stations. And I promise that you won't get spammed, and that your sign up details will remain totally confidential. Sign up now and receive your first issue almost immediately. Last update 05/25/2011
|


